Posts Categorized: Small business advice

8 links for bloggers + small businesses that are helpful like WHOA

Advice-for-bloggers

There are so many smart, helpful people writing smart helpful things on the internet! I rounded up some particularly amazing things for you.

Wait, what? Did you know you can track which of your posts get pinned? And how frequently? And by whom?

Co-signed. Stop using Twitter as a Facebook feed. It looks laaaaazy.

Gosh, but I love transparency. Pinch of Yum is a super successful food blogger and each month she and her husband assemble (and publish!) a traffic and income report. Just reading this made me consider several new income streams! Because if she’s making $23,000+ a month it seems like she knows what she’s doing.

More transparency: the reality of many sponsored posts.

5 tips you’d never think of for personalizing stock photos in social media.

More things I didn’t know about! 12 blogger outreach programs you should sign up for - especially if you’re a fashion, design, or food blogger!

In case you need to be reminded how to run a smart, engaging social media campaign.

If you’re a copywriter (or a writer of any sort) you’ll enjoy these 12 writing exercises that will transform your copy.

Have you read/learned/encountered/written anything good lately? Leave links in the comments!

P.S. Work happiness secret: track your efforts, not your accomplishments and 5 ideas for interesting, I-actually-want-to-click-that tweets.

photo by aleksi tappura // cc

8 Things You Can (and Should!) Do When Business Is Slow

things-to-do-when-business-is-slow
It happens to the best of us. Things are rolling along nicely - new clients! big meetings! money dripping into your account at a sweet and steady pace!  And then allofasudden, nothing but the sound of wind down a long hallway and an owl in the distance. Whoooooo! Whooooo!  Whoooooo are you going to live with when business dries up? 

For the first few days, you treasure the empty inbox. You go to matinees, grab long lunches with friends, and catch up on your Netflix.

But after a few weeks, you start getting a little nervous. Nervous and twitchy and compulsively checking your bank account balance - as though seeing that number is going to help at all.

Dude. Worry not. All of us - every single self-employed human - has gone through dry spells. At the risk of being a total Pollyanna, let’s try to reframe this downtime as an opportunity to get some awesome stuff done.

Here are eight confidence-building, business-netting things you can (and should!) do when business is slow. 

Update your permanent pages
Despite my years as a professional copywriter, I had the same About page for, oh, ever. And my old sales pages? Well, they’re gone now AND THAT IS NOT AN ACCIDENT. I regularly look through and update older, high traffic posts but it’s rare that I look at my own permanent pages - and I bet you’re the same. Seems a bit narcissist to read your own bio on the regs, right?

But other people are constantly reading your About page and Sales pages - my Yes and Yes About page has 50,000+ views! Here’s a 15-part tutorial to help you write better sales pages and here’s a post full of great ‘cheats’ to finish your About page.

Also - you know your About page should end with a call to action, right? Like, you (charmingly) ask them to follow you on social media and/or subscribe to your list? Yeah, I thought you already knew that.

Update and gather testimonials
In a perfect world, you’d have an automated system in place to help you gather testimonials a week or so after you’ve wrapped up with a client. I’m still working out the kinks in mine, but thus far it consists of an email that I schedule for two weeks after we’re finished with a link that takes them to a Google form. The form elicits all sorts of feedback and they let me know if I can use that feedback on my testimonial page.

Not sure what makes a good testimonial?
1. Data! How many more sales? How many more Twitter followers? How many dates? How much money or time saved? We want hard numbers, son.
2. Barriers to purchase that were overcome. “I always thought life coaches were for hippies, but then I hired Nancy.” “$1,500 seemed like a lot of money to invest in my engagement photos, but it was sooooo worth it.”

Contact previous clients and see if they need anything
It’s a million times easier to get repeat business than convert a new customer. Go have a good online stalk of all your previous clients and see if there’s anything you can help with. They’ve been tweeting about a big new project - do they need your help designing the website? She tweeted that they’re expecting a baby - do they need pregnancy photos? Send a sweet, personalized email reaching out and offering to help.

Optimize some of your older, high-traffic posts and re-promote them
Make the post images Pinterest-friendly! Make the posts more readable! Include links to other posts within this post! See if you can use them as guest posts on other sites!

Then re-promote these newly awesome-i-fied posts on your social media channels. Eassssy.

Pitch guest posts or offer yourself up for interviews
When I offered myself up for interviews, I got about 15 takers (!) over a month and a half. That means that heaps of new readers and potential clients heard and read all about me. Nice, right? You can do the same. Find podcasts that regularly feature people in your field and pitch yourself!

You’d also do well to bookmark sites that feature guest posters in your field. Some particularly great ones: Freelancers Union, Oh My Handmade, and  Designsponge’s Biz Ladies column.

Create a different form of your offerings
Can you turn a one-on-one offering into a group offering? Could you turn an e-course into a live workshop? Could you repurpose an old, no-longer-selling-that-well ebook into a series of blog posts? Or guest posts? There are innumerable ways to reinvent your wheel.

Learn that thing you know you should be learning (but have been putting off)
Like, A/B split testing. Or Google Analytics. Or starting a newsletter. Or making videos. Or creating a series of autoresponders.  You knooooow you should be doing these things (and by ‘you’ I also mean ‘me’). Let’s make a pact to finally figure them out. Ready? Go.

Schedule out a bunch of social media updates
I’m a huge fan of promoting other people’s work and I think it’s been a big part of my ‘online success,’ as counterintuitive as that may seem.  I squirrel away great posts and links that I find all over the internet and then schedule out daily ‘Fave Read of The Day’ tweets. (Are we Twitter friends? We should be.)  These pre-scheduled tweets send traffic to lovely people, entertain my Twitter friends, and help me connect with the people I’m promoting.

You can also pre schedule tweets that promote your products and services or link to older, now-optimized posts.

What do you do when business is slow? Leave your tips in the comments!

P.S. If you liked this and don’t want to miss future posts (and you want two free ebooks that’ll help your business), may I be so bold as to suggest that you sign up for my newsletter?

photo by scott robinson // cc

Fix Your Time Estimates, Make More Money

This guest post comes to us from Michelle, who lives in Austin, TX where she teaches creative freelancers how to be more productive and organized and also does writing and content marketing for businesses. When she’s not working, she can be found hanging out with her Shiba Inu, watching an exceedingly nerdy show (or New Girl), and consuming copious amounts of dark chocolate and coffee/tea. 

make better time estimates

Service providers are often told to “productize” their services by creating packages - for example, instead of having editing services available at $50/hr, having a “blog post package” that includes editing of 5 blog posts (up to 1,000 words) and editorial calendar suggestions at a set package price.

There’s not a one-size-fits-all solution when it comes to freelancing, and this is no exception - billing hourly instead of creating service packages might be the best way for you to go. There’s definitely a few strong benefits to going the package route, though:

  • As you do the work, you’ll get faster at it - meaning that you’re making a better hourly rate per package without having to have the “I’m raising my hourly rates” conversation every other month,
  • Having set service packages can prevent “scope creep” syndrome (i.e. “Can you just do this one more thing?”) - clients may still ask for additions, but you have a clear set of services that you agreed to provide for them based on the service package they chose.
  • It makes monthly income goals easier and more attainable - “I need to sell five of this package and two of that one” seems a lot more doable than “I need to bill at least 80 hours this month at $X/hr.”

The main pitfall of going this route is that, as human beings, we notoriously suck at creating accurate time estimates. Our brains are just not wired that way, unfortunately - “accurately guessing how long it takes to write a blog post” was prrrobably a low priority compared to “knowing not to antagonize a saber-toothed tiger” and “ability to run quickly.”

Getting better at it takes practice, and you will improve over time - but I still regularly talk to freelancers who are several years in and figuring it out. Learning the trial and error way is long and hard and quite frankly, it sucks. Instead, today I’m going to teach you why you probably suck at time estimates and how to create more accurate ones.

Why you probably suck at time estimates

As mentioned, “creating accurate time estimates for abstract tasks” was probably pretty low on the totem-pole, evolutionarily. However, there’s another major culprit at play here, which is being in flow.

Most of the time you’re doing your work-work (writing copy or editing if you’re a writer, actually laying out design if you’re a designer, etc.) you’re in flow state - you’re totally engaged in what you’re doing, and you’re a little challenged but not so challenged that you’re frustrated. When you sit down to work, get engrossed in a project, and suddenly look up and it’s three hours later and oh yeah, you really need to eat something? 

That’s flow state.

There’s been several studies done on this and one definitive work. Being in flow state is a really good thing - it’s similar to meditating in that doing it regularly can help dial down anxiety and increase overall feelings of well-being. Not to mention if you’re in flow state, that means you’re creating higher quality work. The problem is that one of the defining attributes of the state is that you lose track of time - we literally have no concept of time while we’re in that state. Hence, bad time estimates.

The second thing that people forget about when creating time estimates is “switching cost.” This is what happens when you change from task A to task B, and you’re not quite engaged in task B yet, but you’re not working on task A any more either, so you have about 15-30 minutes (sometimes longer, but that’s about the average) where you’re much less productive than you’d normally be. This is one of the reasons that multitasking is supposed to tank productivity instead of helping it - you’re constantly going between tasks, so you’re not doing either thing to the fullest extent of your abilities.

Now that you know what’s going on behind the scenes, let’s talk about how to fix it. 

How to create an accurate time estimate for your service package:

  1.  Create a task list for the package. This list needs to include every. single. thing. that happens in between you receiving payment and the client getting their final product. The problem people run into here is that they say, “Oh, it’s simple! They pay me, I write the copy, we do a round of edits, and we’re done! So my task list is short.” Nuh uh. It’s more like: they pay you, you have to send the intake questionnaire, you book the first appointment, you have to review their answers and take notes before the appointment…you get the idea. Every single task, no matter how small, put it on the list. Administrative work, intake work, the process of them getting the deliverables and paying the final balance, everything.
  2. Once you have that task list, create a time estimate for every single task. Ideally, you’re basing this off of actual data you have, because you’ve been tracking your time. Less ideally and more realistically, you’re kind of spitballing it (but that’s okay, as long as you start tracking your time and check back to see how accurate your estimates were). Be as accurate as you can, and again, don’t forget to include things like email - how many emails do you send to a client on average? How long does it take you to type and send each email? And so on.
  3. Then, add 15 minutes between each task. This is to cover the aforementioned switching cost and make sure it’s not coming back to haunt you, come the end of the project.
  4. Add the time estimate up and then multiply it by 1.5.

You’re probably thinking that’s a lot of padding, and it kind of is. Part of the reasoning behind all the extra padding is that I have had freelancers do this exercise and then check back with me in a few weeks. And…they usually find that after tracking their time, the x1.5 estimate was, in reality, pretty close to how much time they’re actually spending.

Part of the idea is that not every service package is going to take exactly the same amount of time. Sometimes you just have a harder time nailing the design or copy or whatever - one client might use all the rounds of revisions, one might not use any. You need to account for both of those clients in your time estimates and create a range that you can use to double-check your pricing against - if you have a client who uses the amount of time in your high-end estimate, are you still making a livable wage? 

Crappy time estimates are a large contributor to “I’ve cut down my spending, I’m working way too much, and I’m still not making enough money - what gives?” syndrome. Which, personally, is a syndrome that I’d like to see eradicated once and for all - so do your homework and make sure your time estimates don’t suck!

Do you struggle with time estimates? What tricks have you used to get better?

P.S. An insanely basic plan for starting a business + working for yourself and How to juggle freelance + a job + a blog

photo by // cc

How to take a summer vacation from your blog (without losing all your traffic or business)

summer-vacation-from-blog
As the child of two teachers and an inveterate, unrepentant traveler I’ve developed a severe aversion to working during the summer
.
What? Social media strategy? If by ‘social media strategy’ you mean ‘white sangria in my friend’s backyard.’
Can I do this conference call from the dock? Wrapped in a He-man towel? Because that’s what’s happening.

But since I spread my travel out over the whooooole year, taking three months off - smack dab in the middle of it - isn’t really an option. And I imagine you’re in a similar situation: wanting to slow things down a bit, but not quite ready/able to remove your foot from the proverbial pedal.

If you, too, would like to take a summer vacation of sorts from your blog (without falling off the face of the internet or losing all your business) here are six ways to do just that. 

1. Do a guest post swap
If you, like me, have been blogging for years upon years, you probably have some great content that’s accruing mold in your archives. And I bet your internet friends do, too. Why not ask them if they’re interested in swapping some particularly phenomenal older posts? New readers (and potential clients) will see your stuff and you won’t have to do any extra work!

2. Rewrite old posts
In those aforementioned moldy archives I bet you’ve got some great ideas that weren’t written or expressed particularly well the first time around. It’s okay! That’s the reality of blogging for years - you get shockingly, staggeringly better as you go. Dig through your archives and see if there are any low-traffic-but-good-idea posts that you can polish up, optimize, and repost.

3. If you have approval, post things you wrote for other blogs/websites/publications
Sometimes, when you write a guest post, you’re forbidden from posting that content anywhere else. If that’s not the case (triple check to make sure) repost it on your own site. To keep your karma clean, include an introduction that says something like “This piece originally appeared on Tiny Buddha but it got such a good response I thought you guys might like to take a peek at it, too.”

4. Reformat + repurpose old posts
THIS TIP IS WORTH ITS WEIGHT IN FINELY AGED CHEDDAR. All those clever, helpful posts in your archives? Take all the useful information contained therein and put it in a different format. My ‘How to get over a breakup‘ post is one of my most popular. I could turn it into an infographic, a podcast, a video, or create a worksheet to go with it, turn it into an ebook and use it to bulk up my newsletter list. Here’s an insanely helpful post about all the other ways you can repurpose content.

5. Schedule out posts and tweets into the future
If you’re super ambitious or reluctant to share blogging duties with anyone else, it’s totally possible to write all your own content and schedule your posts and social media weeks (or months!) into the future. When I’m traveling, I usually have 90% of my content scheduled and check in and update from time to time.

6. Just don’t post
Last summer, I made the executive decision that I wasn’t going to post on Fridays anymore on Yes and Yes. I felt like work was eating my life and that I was just doing a lot of things poorly and nothing very well. And you know what the response was? Good for you Sarah! Taking this time to do you will definitely help enhance all aspects of your life. Enjoy your summer!” and “You are one of the few bloggers I read who posts seven times a week. You deserve to do All The Things with happiness and ease. Cheers to playing outside instead of sitting at a computer! Happy Weekend. :)”

In the best and most loving way, let us remember that the world will turn even if we do not post. The internet will not break if we don’t post every day.

Are you taking a summer vacation from your blog or business? How are you managing it? Share your tips in the comments!

P.S. Want more super applicable advice like this - tailored to you and your business? Check out Laser Focus.

 photo by // cc

How to figure out pricing once and for all (and stop stressing about it already)

figure-out-pricing

This guest post comes to us via Temmy Ola, a copywriter who specializes in crafting crazy-awesome copy for entrepreneurs and online brands. She believes in love selling, and helps clients craft their core messages by lovingly connecting with their tribes on a deeper, emotional level to attract the right clients, make more money and live the life of their dreams. Download her bombshell kit for free here; bearing in mind that she doesn’t mind a little stalking on Twitter.

Sitting all alone in your home office, your stress level is slowly rising. I mean, you’re done with that genius of an idea you’ve been cooking up for a while, and you can’t wait to unveil it to the world as your ‘next big thing’. Palm sweating and all, you’re struggling desperately to find that ‘price’ - the right one for both you and your ideal clients. The answer is not that simple, you turn to Google and maybe other superstars in your niche, and then you see that same over-used cliché springing up every time – “Charge what you’re worth.”

Charging what you’re worth is misleading, to say the least, and shouldn’t by any means be the yardstick for pricing your products and services. Why? Because your worth cannot be quantified. Your worth equals everything that encompasses you – the summary of your years of experience, your level of education, the skills you’ve acquired over the years and everything you’ve invested in yourself, which frankly, is priceless. So instead of charging what you’re worth, charge what your product or service is worth. How to do that? Read on.

  • Premium positioning
    This doesn’t only apply to pricing models; it applies to every other aspect of your business. Position yourself as the expert. Don’t wait for permission to own your expertise, own it already. Premium positioning awards you the opportunity to charge premium prices. When people see you as the expert in your field, and are able to associate quality with whatever you lay your hands on, very few people will have issues with your pricing.

  • Do the quality test
    The next time you want to roll out a new product or service, or even a new launch, gather a group of trusted friends or colleagues to beta test for you. This is not for collecting testimonials, but for constructive criticism and feedback. They’re getting your product or service for free, and you’re testing the waters to know if you’re truly delivering value. After the beta testing, send them a follow up e-mail and ask a series of questions. This gives you an insight into how others see your product or service and enables you to add more value before you finally unveil it.

  • Think like your (ideal) client
    Chances are you’re not your ideal client. This is where you have to get creative. Step out of your shoes for once and step into the shoes of your ideal clients. How rich are your ideal clients? Will they be able to afford this? Ask yourself all these questions before deciding on a price point. Be careful here though, as most people will buy stuffs they may not otherwise be able to afford, if it addresses their “pain points” and they can clearly see the value.

  • Keep track of your investments
    Add up every little thing you invested to make that product or service a reality. This includes every dollar you spent and most importantly your time. How much do you need to break even and make profits? How many clients do you need to work with, without compromising on quality? Add all these together, and pick a price you’re most comfortable with.

Using the above mantras, pick a price that puts money in your pocket and value in your client’s pocket. Remember you’re in business to make money, and if you don’t, you’ll eventually become stressed out and burn out.

How do you set your prices? Tell us in the comments!

photo via tax credits // cc

How To Take Gorgeous, Sale-Making Product Photos

This guest post comes to us via Jessica Hammond, a photographer, writer, and lifelong equestrian. She loves demystifying photography, reading CanLit, and steeped tea with lavender honey. You can follow her on Twitter and Facebook!

Processed with VSCOcam with g3 presetPicMonkey Collage

I’m an avid tea drinker. Prairie Berry loose leaf oolong, caramel roobios, blueberry pomegranate white, run-of-the-mill orange pekoe … You name it, I steep it with lavender honey. Being a photographer and a self-proclaimed tea geek, I’m easily enchanted by mugs, teacups, and ceramics to host my delicious nectar into a personalized drinking device. Sure, I own several plain white mugs, but I enjoy my tea the most when it’s steeping in something handcrafted and special. 

I’m not the only one who loves handmade cups and mugs. While I haven’t got a clue how to make them, I can spot a good one a mile away. As most Etsy shop owners know, that first impression is a key indicator on your sales, engagement, and overall shop’s success. For folks who are looking to amp up their game and reel in the real tea geeks, I’ve got 3 easy steps to achieve great product photography in your Etsy store!  

 1. Know your product, know your message
For now, we’ll stick with the tea drinker’s wet dream: the perfect ceramic. These are handmade items (a huge genre of shops on Etsy distinguish themselves as handcrafted or homemade) that have their own message. Photography is, whether we like to admit it or not, an artistic expression. Photography is also one of the biggest ways in which Etsy shop owners have to show off their impressive work. Poor photographs reflect poorly on the product, as well as the effort that has gone into them.

As the maker of mugs, you know your product like the back of your hand. Tea and coffee and the people who drink them are looking for warmth, looking for taste, and they’re looking for an addition to their interior style. They want to display their mugs proudly, along with their stash of looseleaf and herbal teas. They want to be photographed sipping away on their winter chai as its steam curls in the air. The message your photos need to convey, then, are something like warmth, and taste, and style. Things like comfort and intimacy could also play into your message.

2. Build your space
Not many of us have home studios, large umbrellas, and a range of external flashes. That’s okay. You’re a handcrafted tea cup creator, not a photo studio! Whether you’ve got a dSLR, a point-and-shoot, or an iPhone, couple that with your kitchen counter, floor, and a big window? You’re ready to take some photos, my friend.

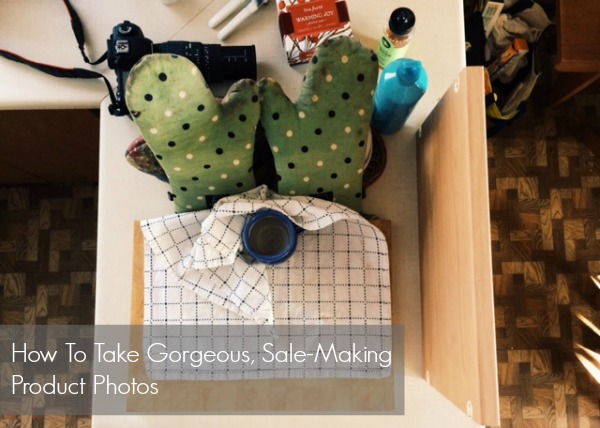
One of the most important points to remember about product photography is to make it intentional. Whether you want your product to be isolated and on display, or surrounded by complimentary items, images, and symbols, is entirely up to you. But either way, you have to make that decision.

Start with a few test shots, focusing in on your product. Review the photos and see what’s distracting your eye — are there odd shapes or out-of-place colours in the background? Does the isolated tea cup look lonely and dejected all by itself, or regal and stylish? There’s no requirement stating you need to take The Perfect Shot the first time you do. Mug maker, remember?

 3. Set your scene
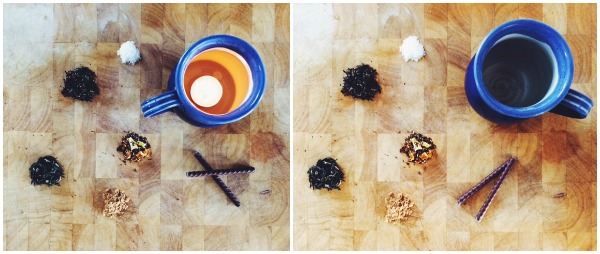
Don’t be afraid to get stylish. You don’t sell cookies and sugar cubes? That doesn’t mean you can’t include them in your photo! What goes better with tea than sugar, or honey from a label-free jar on a comb, or a splash of milk, or cookies?

Carefully placed piles of loose leaf tea would also compliment your tea cup nicely! When you figure out your message, and you decide what sort of space you need to build, pull together your elements. Maybe you want a collection of wildflowers in a clear jar on the table. Whatever you deem fit, make sure it adds to the scene. Great inspiration for setting the scene would be magazines like Kinfolk, stylist and blogger Beth Kirby, blogger Kelsey Brown, and blogger Sarah Kieffer.

If you’re an Etsy shop owner, you know that first impressions are a key indicator on your sales, engagement, and overall shop’s success. Because of this, you want to make sure you:

 1. Know your product and know your message. Picking keywords to describe your product will help you understand your message!

2. Build your space. Whatever you do, make your space intentional!

3. Set your scene. Once you know your message and you’ve built your space, set up your scene using the appropriate style!

Do any of you guys sell physical products?  How do you photograph them?  Share any tips in the comments!